What Are the Dangers of Raccoons?


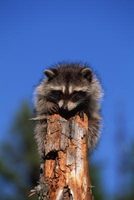
Raccoons can pose many hazards to household pets, people, homes and gardens, and other wild animals. People can help to prevent problems with raccoons by securing all outside garbage and feeding pets inside (outdoor dishes, both food and water, can attract raccoons). If raccoons around a home become a nuisance, home owners should contact the nearest Fish & Wildlife facility or Humane Society for assistance as soon as possible.

Dangers to Household Pets

  • Raccoons can carry a number of parasites and diseases which can be transmitted to cats and dogs. The most common types of parasites and diseases that raccoons may carry, and which pose a risk include: rabies, distemper, roundworm, mange, leptospirosis, fleas, ticks and coccidiosis. To help protect animals from contact with raccoons, cats and dogs should be vaccinated against rabies, dogs should have up-to-date distemper and leptospirosis vaccinations and outdoor pets should be kept indoors at night.

Dangers to Adults and Children

  • Raccoons can also transmit parasites and diseases to adults and children. When transmissions occur, they usually occur as a result of coming into contact with a raccoon. Raccoons will bite or scratch if they are backed into a corner or if people or children try to handle or pick them up; rabies, leptospirosis and parasites such as mange can be transmitted to people from direct contact with raccoons. Raccoons can also leave worm eggs in their environment, particularly roundworm eggs, which children can ingest through eating dirt or soil. Children may also be scratched or bitten by raccoons if they try to feed raccoons by hand.

Dangers to Homes and Gardens

  • Raccoons can cause extensive damage to gardens and homes. When raccoons create a nest, they like a safe, sheltered and warm place; if homes are not protected against outside animals, raccoons can tear up attics, chimneys and even foundations. To keep raccoons out of homes, all access and venting points around the bottom of the home, and in the attic, should have screen covers; chimneys should have screen covers as well to keep wildlife out.

    To protect gardens from raccoons, all foods should be harvested as soon as they are ready; any foods which have fallen to the ground need to be removed immediately. A fence around the garden, and night lighting, can also help to reduce raccoon visitors.

Dangers to Other Animals

  • Raccoons are predators, and they have been known to attack and kill fowl; they also eat eggs. People who are raising fowl need to be particularly vigilant to keep raccoons out of the area and to keep fowl safe at night. Eggs laid outside and inside of the fowl housing area should be picked up as soon as possible as any eggs lying around can attract raccoons. In natural habitats, raccoons can affect populations of turtles by eating the turtle eggs, and nesting waterfowl by eating eggs and attacking the birds.

Source

Surgical Staples Vs. Sutures

The main concern with any wound, whether it’s accidental or an opening for a surgical procedure, is to get it closed as efficiently as possible so that the body may begin the healing process and avoid infection. The two closure mechanisms that are used for most wounds are surgical sutures and surgical staples.

Sutures

  • Usually referred to as stitches, surgical sutures are the most common method for closing wounds. Using a needle and specially formulated thread, a doctor physically sews the lips of a wound together. Suture needles may be straight or curved, and the suture thread may last anywhere from days to years, depending on the variety of thread used. Sutures can be used for just about any wound and are used exclusively for wounds on the hands, feet, neck and face.

Staples

  • Surgical staples are made of stainless steel, with two legs that enter either side of the wound and a crossbar that lays parallel to the skin. When surgical staples are being used, the wound is first held closed with the aid of forceps. Then the stapler, which holds a clip of five to 25 surgical staples, is used to install the actual staples to close the wound. Staples are commonly used on wounds on the arms, legs, abdomen, back and scalp.

Suture Advantages And Disadvantages

  • Sutures come in a variety of types. The needles can be straight or have a variety of curves to make stitching different areas of the body easier. Additionally, the thread comes in different strengths. Some sutures may only last a week and are absorbed into the body and disposed of naturally, whereas other sutures won’t be absorbed and must be removed by a doctor once the healing process is complete. However, sutures take time to put in, and while that may not be an issue much of the time, it can pose a difficulty in certain situations, particularly where large wounds or incisions are concerned.

Staple Advantages and Disadvantages

  • The primary advantage of surgical staples is their speed. Once a wound is ready to be closed, surgical staples can be put in much faster than sutures. Additionally, staples are a point-and-click method, since the stapler does all the work. This is particularly advantageous if there are no doctors with the skills to close wounds well or quickly. Staples do have to be removed however, and they need a special tool with which to do it.

Choice

  • The best method that a medical facility can use is to keep both sutures and staples on hand for the closure of wounds. Which method is best, staples or sutures, can only be decided based on the type of wound that has to be closed, and the particular health of each patient. All in all, it’s a good idea to keep as many options open as possible.

Source

How to Use a Y-Site on Primary IV Tubing


Y-ports, also known as piggybacks, provide a second access point in patient IV tubing for additional IV medications to be given. The most common setup is to have maintenance fluids, such as normal saline or Lactated Ringer’s, infusing as the primary fluid. Medications such as antibiotics are normally administered through a secondary port or Y-port. Many medications must be given on a pump and cannot be infused through a Y-port connection. Know your facility’s procedures concerning proper administration for all IV fluids and medications.

Things You’ll Need

  • Primary IV fluids
  • Meds to be piggybacked into Y-port
  • Alcohol preps
  • Primary tubing
  • Secondary tubing
  • If patient does not have an IV in place, you will need IV start supplies per your facility’s guidelines
  • Ensure that the current IV is working properly. For this article, we will assume that the patient has been on IV fluids and just needs piggyback medication given. Wash and dry your hands. Open the package with the secondary tubing. Remove the protective cover and the spike the port of the medication bag. Gently squeeze the medication until the drip chamber is about halfway full.

  • Allow the medication to flow down the tubing to where the end is sealed off. Using the roller clamp, clamp the tubing so that when the end cap is removed, the medication does not run out on the floor.

  • Locate the Y-port on the primary tubing. Using an alcohol prep, thoroughly swab the port. Hold the tubing so that the port does not touch anything.

  • Remove the end cap from the piggyback medication, being careful not to allow the tip to touch any surface. Immediately connect the tip to the Luer lock hub you’ve just cleaned with alcohol. Tighten the Luer lock into place, being sure that the connection isn’t cross-threaded. Do not overtighten, as this can damage the tubing.

  • Hang the secondary med higher than the primary fluids so that the meds infuse first. Adjust the roller clamp on the secondary tubing to obtain the proper drip rate.

  • When the med has finished infusing, the primary fluid will begin to infuse. At this point you can clamp off the secondary med and hang it below the primary fluid. Ensure that the primary fluid is dripping at the proper rate. Chart the medication given in the med area of the patient’s chart. If the patient is on strict I’s and O’s, record the total fluid infused from the secondary med in the I’s and O’s area of the chart.

Tips & Warnings

  • Never use a Y-port to administer meds that require an IV pump for safe delivery. Assess the patient’s IV site at least once per shift to ensure proper functioning and that there is no pain, infiltration or leaking.

Source

How to Access a Port With a Huber Needle


An implanted port, usually referred to simply as a port is often placed in patients requiring long-term IV treatment cancer patients receiving chemotherapy come to mind as they receive multiple rounds of chemo over an extended time period. A nurse certified in port access can access the port with a Huber needle for other types of IV medications and fluids. Cancer patients may be hospitalized for conditions unrelated to their cancer diagnosis; the port allows IV access with only one needle stick. A port may also be used to draw blood for lab work. Patients with ports typically have very poor veins and accessing them is almost impossible.

Things You’ll Need

  • Huber needle
  • 10 cc syringes pre-filled with normal saline
  • extra normal saline
  • central line dressing kit
  • small transparent dressing
  • sterile gloves
  • mask

Prepare Equipment

  • Before beginning, wash your hands. Since the port is in a major blood vessel, aseptic technique minimizes the risk of infection. Placing the Huber needle is a sterile procedure. Wear a mask while performing this procedure. Don sterile gloves and open central line kit, using the inside as a sterile field.

  • Open Huber needle packaging and place needle in sterile field, being careful not to touch any non-sterile surface with any part of needle. Attach a 10cc syringe of normal saline to end of tubing attached to needle. Flush until tubing is primed with saline.

  • Palpate the implanted port for the center of the port. The insertion site feels spongy. After identifying insertion site, don sterile gloves. Clean the insertion site with chlorahexidine swab or as per your facility’s protocol. Begin at the center, working outward. Allow the site to dry thoroughly.

Accesing Port

  • Remove needle guard from Huber needle. Place two fingers on either side of port site with non-dominant hand to stabilize skin around port. Holding the needle with the other hand, grasp the flexible "wings" using the thumb and middle finger. Firmly insert the needle at a 90 degree angle until you feel the end of the needle hit the back of the port.

  • Carefully release the needle, warning the patient to lie still as needle is not secure. Attach a 10cc syringe of normal saline to end of tubing. Pull back and aspirate to confirm blood return. Flush tubing using all of normal saline syringe. Secure the needle per your facility’s policy. Some facilities may not allow tape to be used. Cover site with transparent dressing, ensuring that entire site is covered.

  • Mark dressing with date, time, and your initials in designated area on dressing. Clamp tubing if no infusion or medications are to be given; otherwise, attach IV tubing and begin infusion. Clear away trash, disposing of syringes and any sharps in approved sharps container. Wash your hands and document the port access in the patient’s chart. Monitor the site and flush per your facility’s guidelines.

Tips & Warnings

  • Beginners may find it easier to have someone help them the first few times they access a port. This person should be experienced in port accessing and troubleshooting, and should be able to take over the procedure if needed.
  • Only nurses certified in accessing implanted ports should attempt to access a port. Do not allow any part of the needle or tubing to become contaminated, strict aseptic technique must be used to prevent potentially fatal infections. Document placement of access and check regularly for patency. Follow your facility’s guidelines on flushing port and dressing changes.

Source

List of Hospitals in Chicago, Illinois


Chicago is the nation’s third-largest city, with over 2.8 million residents. The city contains hundreds of museums, art galleries, restaurants and cultural institutions, and attracts visitors from all over the globe. Chicago’s 227 square miles also contain many hospitals, many of which draw medical students and professionals, as well as patients, from around the world.

Northwestern Memorial Hospital

  • Northwestern Memorial Hospital occupies an enclave just off Lake Shore Drive in Chicago’s Streeterville neighborhood. Northwestern Memorial is a major medical and research institution, with 1,600 affiliated doctors who also serve as the faculty of the University’s Feinberg School of Medicine. The hospital was honored by Thomson Reuters as one of the nation’s top 100 hospitals for 2008, and operates a vast number of departments covering hundreds of specialties. Created in 1972 by the combination of two 19th-century hospitals, Northwestern continues to expand, most recently adding the Bluhm Cardiovascular Institute in 2005, and Prentice Women’s Hospital in 2007.

    Northwestern Memorial Hospital
    251 East Huron Street
    Chicago, IL 60611
    312-926-2000
    nmh.org

John H. Stroger, Jr. Hospital of Cook County

  • John H. Stroger, Jr. Hospital of Cook County, which was named for the longtime Cook County Board of Commissioners President, replaced the old Cook County Hospital in 2002. Stroger is a public hospital with 464 beds spread over 1.2 million square feet and is operated by the Cook County Bureau of Health Services. The hospital’s stated goal is “to provide a comprehensive program of quality health care with respect and dignity, to the residents of Cook County, regardless of their ability to pay,” and in fact the hospital is known for treating the county’s poorest residents. Stroger’s many departments include critical care, infectious diseases, cardiology, dermatology and general medicine. The hospital is also involved in a variety of research projects, and is a teaching hospital, offering internships to third- and fourth-year medical students from U.S. medical schools.

    John H. Stroger, Jr. Hospital of Cook County
    1901 West Harrison Street
    Chicago, IL 60612
    312-864-6000
    cchil.org

Children’s Memorial Hospital

  • Located in Chicago’s Lincoln Park neighborhood, Children’s Memorial calls itself “the region’s top provider of pediatric specialty care,” treating more than 140,000 children in 2009. The staff includes 1,100 pediatric specialists, and the hospital helps to train about 200 more each year through its association with the pediatric department of Northwestern’s Feinberg School of Medicine. The hospital is also active in research, with hundreds of papers published in medical journals each year, and the Children’s Memorial Research Center opened in 1986. Children’s Memorial plans to open a new building, the 23-story Ann & Robert H. Lurie Children’s Hospital of Chicago, on the Feinberg campus in 2012.

    Children’s Memorial Hospital
    2300 North Lincoln Avenue
    Chicago, IL 60614
    773-880-4000
    childrensmemorial.org

Source

Nuclear PET Scan Side Effects


Nuclear PET (positron emission tomography) scans help diagnose and treat many different diseases, including cancer and heart disease. Before the scan, the patient often receives an injection of a small amount of radioactive material so that the organs and tissues show up clearly on the PET scan. The radioactive material can also be swallowed or inhaled. Most patients do not experience side effects from PET scans, according to Brigham and Women’s Hospital, an affiliate of Harvard Medical School, but some patients can experience side effects from the scan itself or the radioactive material.

Discomfort

  • One of the most common side effects of nuclear PET scans is discomfort, though it is not usually significant. Patients feel a small prick when the radioactive material is administered into a vein, and some patients report a slightly uncomfortable cold tingling in their arms when the material is injected. Pain at the injection site may occur as well, but it typically subsides within a few hours. Some PET scans require a catheter placed in the patient’s bladder, which can also be a source of discomfort or pressure.

Claustrophobia

  • Some patients feel claustrophobic while in the PET scan machine, which is like a large, enclosed tunnel. Patients who experience severe claustrophobia may have difficulty breathing or experience rapid heartbeat and elevated blood pressure. Some doctors administer a sedative to extremely anxious or claustrophobic patients prior to the scan to help keep them calm and still during the procedure.

Allergic Reactions

  • Allergic reactions to the radioactive material given to patients before a PET scan are rare, but can occur in some patients, according to RadiologyInfo.org. Patients should inform their doctors if they have ever had a negative reaction during any other nuclear medicine procedures. Doctors monitor for signs of an allergic reaction prior to the test, as it typically takes about one hour for the substance to move through the body. Patients experiencing trouble breathing or other signs of an allergic reaction, such as rash, hives or swelling, should let their doctors know immediately.

Pregnancy Side Effects

  • Women who are pregnant or breastfeeding should usually avoid nuclear PET scans to prevent injury or illness to the baby. In some cases, a PET scan may be necessary for a pregnant or breastfeeding mother because the benefits of the procedure to diagnose a potentially life-threatening disease or condition outweigh the risks to the child. Brigham and Women’s Hospital recommends not breastfeeding for 36 hours after radioactive material is administered for a PET scan.

Source

What Is a Medicare GP Modifier?

Medicare beneficiaries may receive a Medicare Summary Notice or an Explanation of Benefits (if enrolled in a private plan) that has codes that make little sense unless you are a billing professional. While these codes are usually explained in the footnotes of the notices, understanding how Medicare billing and coding works can help a beneficiary avoid denials or overcharges. A Medicare GP modifier is an example of a billing code that beneficiaries may see on their notices.

Coding System

  • The Medicare GP modifier refers to a Medicare billing code under the current Healthcare Common Procedure Coding System. This coding system is an industry standard for billing Medicare. These codes are designed and implemented by the Centers for Medicare & Medicaid Services, which is the federal regulating agency that oversees Medicare.

GP Modifier

  • According to the Centers for Medicare and Medicaid Services, a GP modifier means that “Services [are] delivered under an outpatient physical therapy plan of care.” This means that the service or item received was a part of a preexisting plan of care for physical therapy created by Medicare doctors and physical therapists. It also means that the service was performed in an outpatient setting. Put another way, the patient did not need to be admitted to a hospital to obtain the service. In order for physical therapy to be covered by Medicare, a plan of care is required.

What Is a Modifier?

  • Sometimes a code alone is not sufficient enough to explain how the item should be charged. Variables affect how much the patient will be charged, whether the service is under any restrictions or if there is anything else required before this claim can be paid out by Medicare. A GP Modifier will accompany a code that more explicitly explains what the service was. For example, if a patient received in-home hydrotherapy as a part of his physical therapy plan of care, the code for in-home physical therapy (G0151) would be accompanied by the letters "GP." The full code would be G0151GP.

Code Levels

  • What the code that the GP modifier accompanies looks like depends on the code level. Codes are separated into three levels. Level I codes adhere to the American Medical Association’s Current Procedural Terminology and consists of numbers. Most services are found under Level I. Level II codes are both numbers and letters and are used to bill non-physician services. Level III are Medicaid codes. GP modifiers usually accompany Level II codes as physical therapy typically falls under this category.

History

  • The coding system was created in 1978 in order to standardize coding for Medicare and Medicaid. The codes are specific to the item or service being billed. However, until the Health Insurance Portability and Accountability Act of 1996 (HIPAA), it was only used voluntarily. Now HIPAA makes its use mandatory.

    The Medicare Improvements for Patients and Providers Act of 2008 called for improvements and streamlining of the codes, which was implemented and carried out by the Centers for Medicare and Medicaid Services.

Source

Medicare & Secondary Insurance

Even if you’re covered by two insurance plans, you can’t get double reimbursement for the same medical bills. If one of your insurers is Medicare, government rules determine how the two coverages interact.

Coordination of Benefits

Whenever you have two sources of health insurance, the insurers have to coordinate benefits. One of them becomes the primary insurer and pays first, up to the policy’s limits of coverage. The secondary insurer than takes over and pays any remaining expenses, again up to the limits in your policy. Depending on the policy and the bills you’re submitting, you still may have out-of-pocket expenses.

Secondary insurance is not the same as supplemental insurance. A secondary insurer could be Medicaid, your employer’s health coverage or your spouse’s workplace coverage, for instance. Supplemental insurance, also called Medigap, is specifically tailored to cover copayments, coinsurance, and deductibles that Medicare doesn’t pay, and possibly services Medicare doesn’t reimburse. Medigap is designed not to cover the same expenses as Medicare.

Tip

  • You must sign up for Medicare Part A and B to qualify for a Medigap supplemental policy. Some private insurers require you sign up for Medicare Part B, if you’re eligible, before they serve as secondary payer. Medicare Part A pays for stays in hospitals and similar facilities; Part B covers doctor visits and treatments for preventive, diagnostic and other medically necessary services.

Primary or Secondary

The Centers for Medicare and Medicaid Services list some examples of how Medicare and your other insurer coordinate benefits:

  • If you’re over 65 and covered by an employee plan — whether through your employer or your spouse’s job — Medicare is the secondary payer. An exception occurs if the employer has fewer than 20 employees. Then Medicare becomes primary.
  • If you’re covered by an employer retirement plan, Medicare pays first.
  • When you have coverage under COBRA — a federal policy that allows you to keep workplace insurance for 18 months after you leave the job — Medicare pays first.
  • If you’re covered by Medicaid as well as Medicare, Medicare pays first.

How It Works

When you give your insurance coverage to your doctor, hospital or other medical caregiver, you provide information for both Medicare and your other insurance. The doctor submits the claim. If you have to pay up front for a service, you’ll get a reimbursement check later.

Primary and secondary status has nothing to do with which insurer pays soonest. If your private insurance is primary but takes a long time to pay the claim, the doctor may submit the same bill to Medicare. The agency can send you a conditional payment. Later, when you receive your payment from the primary insurer, you reimburse Medicare accordingly.

Source

How to Tell If a Doctor’s Signature Is Real


With a little practice and a sample of the doctor’s actual signature, anyone can learn to forge a doctor’s signature. A forged signature can look especially realistic if an individual uses an actual doctor’s prescription pad. Some individuals may forge a doctor’s signature to write a doctor’s excuse or to obtain prescription medication. Forging a doctor’s signature for any reason is a felony offense. Fortunately, there are things you can do to tell if a doctor’s signature is real.

  • Call the prescribing doctor’s office for verification. If you are another health care provider — such as a pharmacist — you can call the office of the prescribing doctor to verify the prescription to be filled. The doctor’s office will have a record of every prescription written for each patient in their office.

  • Look for doctor terminology. If you are unsure of the signature, investigate other parts of the signature. For example, a doctor is likely to write PRN for take as needed. A nonmedical professional may not know this.

  • Compare the signature. Look for other papers or prescriptions lying around. Look for similarities in the signature.

  • Take note of the prescription pad used. Compare it to other notes or prescriptions written on a particular doctor’s prescription pad. An individual may try to replicate a prescription pad for their own personal use.

Tips & Warnings

  • In most states, forging a doctor’s signature to obtain a prescription is a felony. This crime is punishable by jail time or heavy fines.

Source

How to Endorse Your RN License to New York

Because New York is not a member of the National Licensure Compact Agreement, obtaining a registered nursing license by endorsement requires that all the criteria established by the New York State Board of Nursing be met. Further, whether the state of your current license is a member of Linksys determines whether you will request your license verification by mail or via the Internet. Two separate certificates of continuing education must also be completed via the Internet. Application for licensure to New York state is more complicated than endorsement applications to other states.

  • Navigate to the New York State Board of Nursing site and download the PDF Nursing License Application Packet. Print the PDF file containing multiple documents (see links in the Resources section).

  • Locate the Nurse Applicant Checklist to help you keep up with the many pieces of paperwork this process will require. Set this checklist aside where you can easily refer to it. Determine whether your current state of licensure is a participating member of Linksys by checking the website found in the Resources section. New York state is a member of Linksys.

  • Verify your current license through Linksys if your current state is a member. Pay for this service by credit or debit card. The fee for this service is $30 to $60 depending on your license type and the number of jurisdictions you are requesting receive this information. Navigate to to the Linksys verification site at the address noted in Resources and click on the Nurse License Verification button to the right. Follow the computer prompts to request that your current state verify your licensure to New York State. Verify your current license by mail if your current state is not a member of Linksys. Complete the two-page Verification of Other Professional Licensure/Certification form (Form 3). Complete Page 1 of the form and mail both pages to your current State Board of Nursing.

  • Complete Page 1 of Form 2, the two-page Certification of Professional Education and send both pages to the school of nursing that awarded your nursing degree.

  • Complete the four-page Form 1 Application for Licensure in ink, providing all information requested. Do not sign the final Section 26 on Page 4.

  • Visit a notary public with the completed license application, your articles of identification and the required fee. Present your ID documents and sign the application when directed by and in the presence of the notary.

  • Complete the mandated training on child abuse. This course can be completed online. A certification of your completion of this course must either be sent electronically to New York State or a printed company must accompany your application for endorsement. The fee for this course depends upon the chosen provider. A list of approved providers for this training can be found in Resources.

  • Complete the mandated training on infection control. This course can be completed online. A certification of your completion of this course must either be sent electronically to New York State or a printed company must accompany your application for endorsement. The fee for this course depends upon the chosen provider. A list of approved providers for this training can be found in Resources.

  • Complete your portion of the three-page Form 5, Application for Limited Permit, if appropriate. This permit can be completed only if you have an employer who is willing to endorse you and supervise your practice until your permanent license arrives. Your employer and supervisor will complete pages 2 and 3. Return this completed document to the address printed on the form.

  • Mail Form 1, the Application for Licensure and Form 5; the Application for a Limited Permit, if applicable; the license fee of $143; and the limited permit fee of $35 to the address in bold font at the very bottom of Page Two.

Tips & Warnings

  • Submit your application for licensure allowing time for the verifying organizations to send the required independent verifications to the Office of the Professions. This may take eight weeks or more.
  • Once you are licensed to practice nursing in New York state, you are legally required to notify the Education Department’s Division of Professional Services of any change in your mailing address or name within 30 days. Per the board, “failure to do so may be considered professional misconduct.” It may also delay license renewal, resulting in late fees.

Source

Five Active Listening Skills Needed in the Medical Field


Communication skills are important in everyday life, but in the medical field, these skills can be the difference between life and death. Active listening skills are critical for effective patient-centered care, especially for obtaining important medical information. Active listening shows patients that you care and establishes a foundation of trust. To be effective in a job in the medical field, you must understand the five keys elements of active listening needed in health care.

Undivided Attention

  • Open communication through active listening is the keystone of good health care. Active listening is a therapeutic technique that establishes trust in a health care professional-patient relationship. To begin, give the patient your undivided attention and refrain from interrupting until he is finished speaking. Ignore distracting thoughts and avoid outside distractions, including environmental factors and other people’s conversations. Focus on the person to show he has your undivided attention.

Body Language

  • Body language is just as important as what you say during a conversation. Maintain eye contact and nod at appropriate times to show you are actively engaged in what your patient has to say. Avoid crossing your arms and keep an open posture to show you are open to communication. Avoid grimaces and frowns, which can discourage patients from sharing personal information due to embarrassment. Oftentimes, patients are already scared and uncomfortable when coming to an office or medical facility. By simply touching her hand, you can encourage her to share more details about her condition.

Acknowledgement

  • After listening to what your patient has to say, paraphrase her comments to verify your understanding of the situation. Not only will this clear up any misconceptions you have, but it also helps to validate the patient’s feelings about what she is going through. Clarify important details by asking if you have a thorough understanding of what he is saying and feeling. Ask open-ended questions to help him elaborate on key aspects you want to take note of or record in his chart. As an active listener, the most important goal is to understand what your patient is saying.

Nonjudgmental Attitude

  • Once you have a thorough understanding of your patient’s message, withhold judgment, even if you disagree. Avoid interrupting with counterarguments, which stifle conversation and can ruin trust. Critical comments will only frustrate the patient and limit your understanding of his message. As a medical professional, it is your job to provide care and understanding without judgment of your patient’s choices and experiences.

Response

  • Active listening is based on honesty, trust and understanding. Provide your professional opinion of the situation, but don’t talk down to the patient just because she doesn’t have the same medical training as you have. By clarifying the patient’s message, you can help him explore other points of view. Show your empathy for the patient by treating her with respect. Always treat patients the way you would want to be treated if the situation were reversed.

Source

Signs of a Manic Depressive


Manic depression,or what we now call bipolar disorder, is a mental condition that drags an individual through cycles of extreme joy and sorrow. These episodes of high and low points, which can last from weeks to years, contribute to risky behavior and thoughts of suicide. Manic depression also jeopardizes social life, making it difficult to hold onto stable relationships. If someone you know has manic depression, learning about the condition will prepare you for the sudden emotional changes.

Manic Mood

  • During a manic episode, an individual experiences a euphoric sense of happiness and excitement. However, her joy can quickly turn into anger and hostility. Thoughts race through her mind. In some cases, the thoughts are short, uncontrollable and unrelated, confusing her and attributing to a trapped sensation. A heightened energy level leads to insomnia.

Manic Behavior

  • A manic individual talks rapidly and excessively. He may be unable to control the volume of his voice. During conversation, he will reveal delusional, grandiose plans and rarely stay on a topic for long. He demonstrates poor judgment and reckless behavior. For example, he may suddenly quit his job and spend large amounts of money. Due to a heightened sex drive, he may impulsively pursue sexual relations. He feels invincible or superhuman. In severe cases, psychosis develops.

Depressive Mood

  • During a depressive episode, an individual experiences feelings of emptiness and sadness. Her current problems in life appear hopeless, leading to irritability and lack of concentration. A sense of exhaustion increases her need for sleep; however, insomnia may develop. She will have trouble ignoring thoughts of death or suicide.

Depressive Behavior

  • A depressed individual cannot find enjoyment in former hobbies and interests; his sense of pleasure may be entirely lost. He may cry uncontrollably and appear lethargic. He will express a delusional sense of guilt; for example, he may blame himself for your problems, even if they are unrelated. A drastic change of appetite will lead him to gain or lose weight. In severe cases, he may attempt suicide. When the episode is over, he may find temporary stability or immediately return to mania.

Source